
Your arms have become the only place your baby will nap. It is a sweet and special bond. But it is also exhausting. You might feel trapped on the couch, unable to do anything for yourself. If your baby only sleeps while being held, you are not alone. This is a very common challenge for parents. The good news is that you can teach your baby to nap soundly in their crib.
Think of independent sleep as a new skill for your baby. Like any new skill, it takes time, patience, and a gentle approach to learn. It does not have to involve endless crying or stressful methods. With the right strategy, you can guide your little one toward restful crib naps. This gives them the restorative sleep they need and gives you some much-needed time back in your day.
This guide provides a clear roadmap. We will first explore why your baby might be fighting crib naps. Then, we will give you a step-by-step plan to create the perfect sleep foundation. Finally, we will show you gentle methods to make the transition from your arms to the crib a success. You can do this, and we are here to help.
First, The "Why": 4 Common Reasons Your Baby Protests Crib Naps
Understanding the root cause of your baby's nap resistance is the first step toward finding a solution. It is rarely because your baby is being difficult. Instead, their behavior is a form of communication. They are telling you what they need or what feels wrong. By playing detective, you can pinpoint the issue and choose the right strategy. Most nap problems fall into one of four common categories. Once you identify your specific challenge, the path forward becomes much clearer. Let's look at the most frequent reasons babies protest naps in their crib.

The Overtiredness Trap (It’s All About Timing)
It seems logical that a very tired baby would fall asleep easily. However, the opposite is often true. When a baby is awake for too long, their body enters a state of stress. It releases a hormone called cortisol. Cortisol acts like a shot of adrenaline. This gives your baby a 'second wind' and makes it almost impossible for them to settle down and relax. This is the overtiredness trap. You missed their ideal sleep window, and now they are too wired to nap.
The key is to watch for their wake windows. A wake window is the amount of time a baby can comfortably stay awake between sleeps. This window changes as they grow. A newborn might only handle 45 minutes, while a 6-month-old might be awake for 2-3 hours. Paying close attention to these windows helps you put your baby down for a nap when they are sleepy, not exhausted. This increases your chances of a peaceful nap in the crib. Learning your baby's sleepy cues, like getting quiet or staring into space, is just as important as watching the clock.
The "Wrong Recipe" (Negative Sleep Associations)
A sleep association is anything your baby connects with the act of falling asleep. Think of it as their personal 'go to sleep' recipe. If their recipe has always been feeding, rocking, or being held, they believe they need those things to fall asleep. This is not a bad habit you created; it is a natural way babies learn. However, it becomes a problem when they cannot recreate that recipe on their own. When they wake up after a short sleep cycle, which can be just 30-45 minutes long, they cry out for you to provide the recipe again.
The goal is to help your baby learn a new, simpler recipe they can make themselves. This new recipe involves 'positive' sleep associations. These are things that are present in their crib, like a dark room or the sound of a white noise machine. When they learn to fall asleep with these cues instead of your direct help, they can put themselves back to sleep between cycles. This is how short catnaps turn into long, restorative crib naps. The transition involves gently replacing the old recipe with the new one.
The Startle Factor (An Unfamiliar Environment)
For nine months, your baby was snug and secure in the womb. After birth, your arms provide a similar feeling of warmth and closeness. In contrast, a crib can feel vast, open, and cold. When you place your baby in the crib, they may feel a sense of insecurity. This can trigger their Moro reflex, also known as the startle reflex. It is that sudden feeling of falling that causes their arms to flail out. This reflex is strong enough to wake a baby from a light sleep.
For babies who are not yet rolling, a snug swaddle can work wonders. It recreates that womb-like feeling of security and helps contain the startle reflex. Once a baby can roll, you must stop swaddling for safety. At that point, a sleep sack can provide a sense of comfort. Making the crib a familiar and happy place during awake time can also reduce the startle factor. When the crib is not just a place for sleep, it becomes less intimidating.
The Usual Suspects (Growth Spurts, Teething & Regressions)
Sometimes, a baby who was napping well suddenly starts protesting the crib. Before you assume your method stopped working, consider these temporary disruptors. Babies go through many developmental changes that can affect sleep. Teething pain can make it hard for a baby to get comfortable. Growth spurts can increase hunger, leading to more frequent waking. These are physical discomforts that can make napping a challenge.
Sleep regressions are another major factor. These are periods when a baby's brain is making a huge leap, like learning to roll over, crawl, or pull to stand. This new skill is so exciting that they want to practice it all the time, even in the crib. Common sleep regressions happen around 4, 8, and 12 months. During these phases, it is important to stay consistent with your routines. Offer extra comfort as needed, but try not to introduce new sleep associations that you will have to undo later. These phases are temporary and will pass.
The 5-Step Foundation for Successful Crib Naps
Before you try to teach your baby to nap in the crib, you must set the stage for success. Think of it like building a house. You need a strong foundation before you can put up the walls and roof. These five steps are the non-negotiable basics for good sleep. Skipping them will make any transition method much harder. By implementing these foundational elements first, you create an environment that naturally encourages sleep. This makes it easier for your baby to learn the skill of napping independently. Many parents find that focusing on these steps alone can solve many of their nap issues.
Each step addresses a key biological or psychological need for sleep. From the darkness that stimulates melatonin production to the routine that signals safety, these elements work together. They create a powerful message for your baby: this is a safe, predictable place for rest. Be patient and consistent as you put these steps into practice. It might take a few days for your baby to adjust, but this groundwork is essential for long-term success.
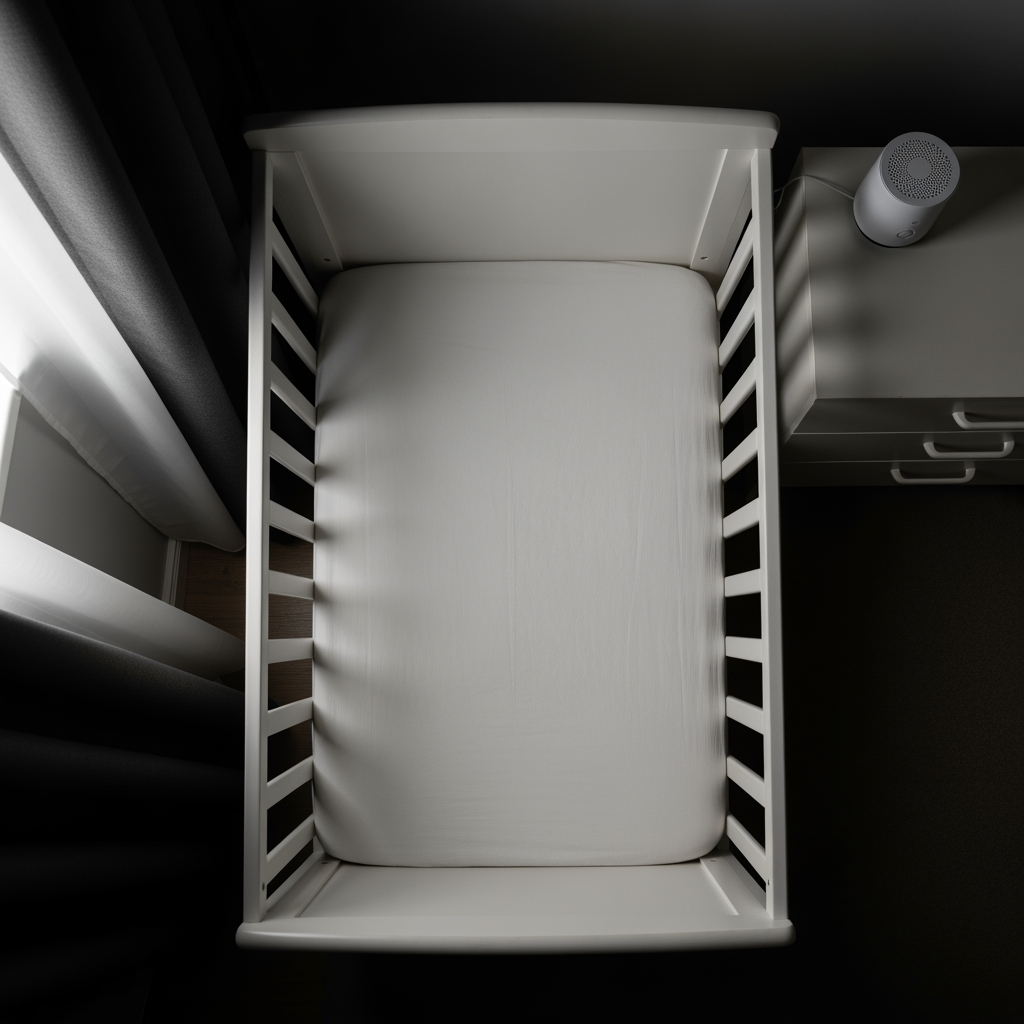
- Optimize the Sleep Space: Create a cave. A baby's sleep environment should be boring. The goal is to minimize stimulation. The room should be pitch-black, even for daytime naps. Use blackout curtains or even temporary solutions like cardboard on the windows. Darkness helps trigger the production of melatonin, the sleep hormone. The room should also be cool, ideally between 68–72°F or 20–22°C. Finally, use a white noise machine. The constant, low hum mimics the sounds of the womb and can block out household noises that might wake your baby. The sound should be continuous and set to a volume of about 50-60 decibels.
- Master Wake Windows: Watch the clock and the baby. This is the most crucial element for avoiding the overtiredness trap. An age-appropriate wake window is your best tool. You can find charts online, but remember they are just a guide. You also need to learn your baby's unique sleepy cues. These are the subtle signals they show right before they become overtired. They might include getting quiet, staring off, having glazed-over eyes, or making small jerky movements. Do not wait for big yawns and eye rubbing; by then, you may have missed the ideal window. Putting your baby down at the first sign of sleepiness is the sweet spot.
- Create a Mini Nap Routine: Signal that sleep is coming. Babies thrive on predictability. A short, consistent nap routine signals to their brain and body that it is time to wind down. This does not need to be long or complicated. A nap routine should only be 5-10 minutes. An example could be: go into the nursery, change the diaper, put on the sleep sack, read one short book, turn on the white noise, sing one song, and then place the baby in the crib. The exact steps do not matter as much as the consistency. Doing the same simple sequence before every nap helps your baby anticipate sleep and relax more easily. You can create a custom infant routine by age to find what works best for you.
- Make the Crib a "Happy Place": Reduce fear and build familiarity. If the only time your baby goes into the crib is when you leave them to sleep, they may associate it with separation and loneliness. You need to change this association. A few times a day, during their happy awake time, spend 5-10 minutes playing in the crib. Place them inside with a few toys while you are right there. Play peek-a-boo over the rail or sing some songs. The goal is to build positive memories. This helps them see the crib as a safe and pleasant space, not a place of abandonment.
- Always Follow Safe Sleep: The non-negotiable rule. This is the most important step of all. The American Academy of Pediatrics (AAP) provides clear guidelines to reduce the risk of SIDS and other sleep-related dangers. Your baby should always be placed on their back to sleep, for naps and at night. The crib mattress should be firm and flat, with only a fitted sheet. There should be nothing else in the crib: no blankets, pillows, bumpers, or soft toys. Room-sharing in separate sleep spaces is recommended for at least the first six months. Following these rules ensures your baby is sleeping in the safest possible environment.
Your Gentle Transition Plan: From Contact Nap to Crib Nap
Once you have built a solid foundation, it is time to begin the transition. The goal is to gently teach your baby to fall asleep in their crib. This process requires patience and consistency. There are several gentle methods you can choose from, depending on your baby's age and temperament. Remember, the aim is progress, not perfection. Some naps will be better than others. The key is to stick with your chosen method and respond to your baby with love and confidence. Below, we compare a few popular gentle approaches. This can help you decide which one feels right for your family.
Choosing a method is a personal decision. Some parents prefer a very gradual approach, while others find a slightly faster method works better for their child. All of these strategies focus on responsive parenting. You are not leaving your baby to figure it out alone. Instead, you are providing comfort and support as they learn a new and valuable skill. This is a journey you and your baby take together. For a more detailed guide on this process, you can learn how to stop contact naps with a step-by-step plan.
| Method | Best For… | How It Works | Typical Timeline |
|---|---|---|---|
| The "Habit Stacking" Approach | Babies highly dependent on feeding/rocking. | Start by adding a new cue (patting, shushing) to your existing routine (rocking to sleep). After a week, the new cue is familiar. Then, slowly reduce the old habit (rock less) while keeping the new one. | 2-3 weeks (Very Gradual) |
| The "Pick Up, Put Down" Method | Younger babies (< 7 months) who are calmed by being held. | Place baby in crib awake. If they cry, pick them up to calm them, but put them back down as soon as they are calm (not asleep). Repeat as needed. | 1-2 weeks (Can be stimulating for some babies) |
| The "Chair" Method | Older babies (> 6 months) who understand object permanence. | Sit in a chair next to the crib, offering verbal and minimal physical comfort until baby sleeps. Every few days, move the chair further away until you are out of the room. | 1-2 weeks (Requires patience) |

Step 1: Start with the First Nap of the Day
Do not try to tackle all naps at once. This can lead to an overtired baby and a frustrated parent. Instead, focus your efforts on the very first nap of the day. There are two good reasons for this. First, your baby is generally the most well-rested coming off of nighttime sleep. Second, sleep pressure, the biological drive for sleep, is highest in the morning. This combination makes them more likely to accept the change and fall asleep in the crib.
Once you master the first nap, you can move on to the second, and so on. For the other naps of the day, it is okay to use your old method, like a contact nap. This ensures your baby gets enough total daytime sleep. Preventing overtiredness is key to making the whole process work. Trying to force every nap in the crib from day one can backfire. A slow and steady approach is more sustainable and often more successful.
Step 2: Practice "Drowsy But Awake"
This is the core skill you are teaching your baby. "Drowsy but awake" means putting your baby into the crib when they are sleepy, but still aware of their surroundings. It's like parking your car in the garage yourself instead of being towed in. It teaches them how to get into their 'sleep space' on their own. This way, if they wake up later, they know where they are and how to settle back down.
It can be tricky to find the right level of 'drowsy'. If your baby falls asleep while you are feeding or rocking them, gently rouse them as you place them in the crib. You might jiggle them slightly or whisper their name. You want their eyes to flutter open for a moment. They should recognize they are being placed in their crib. This small moment of awareness is the foundation of self-soothing. It is the key to connecting sleep cycles and taking longer naps.
Step 3: Offer In-Crib Comfort First
It is normal for your baby to protest when you first put them down awake. Their cry is a communication of this new experience. Your first instinct might be to pick them up immediately. Before you do, try to comfort them while they are still in the crib. Place a firm, steady hand on their chest. This pressure can feel very calming. You can also try rhythmic patting on their bottom or side. Lean in close and make a low, continuous 'shhhh' sound, louder than their cry.
Give these in-crib methods a few minutes to work. You are showing your baby that you are there and they are safe, but you are also holding the boundary that the crib is the place for sleep. This step helps them learn to calm down in their own space. If the crying continues to escalate and these methods do not work, then you can move to your chosen method, such as picking them up to calm them. The goal is to always try the least intrusive soothing method first.
Troubleshooting: What to Do When Naps Are Still a Struggle
Even with a perfect foundation and a gentle plan, you might hit some bumps in the road. Sleep is not a linear process. There will be good days and bad days. The key is not to give up. When you face a challenge, it is an opportunity to troubleshoot. Often, a small adjustment is all that is needed to get back on track. It is important to remember that crying is a baby's way of protesting change. The goal is not always zero crying, but to respond consistently while teaching a new skill.

These common problems can feel like major setbacks, but they are normal parts of the learning process. Whether you are dealing with short naps or intense crying, there are strategies to help. This checklist provides quick solutions for the most frequent issues parents face during nap transitions. Use it as a guide to fine-tune your approach and keep moving forward. Remember, consistency and patience are your best allies. The same process applies if you want to move a co-sleeping baby to a crib; it's all about gradual, consistent change.
- If naps are consistently short (30-45 mins): Short naps, or 'catnaps', usually happen because a baby cannot connect their sleep cycles. One effective strategy is the 'Crib Hour' rule. This means you leave your baby in the crib for a full hour from the time you put them down, even if they wake up after 30 minutes. This is not a cry-it-out method. If they are crying, you can go in and offer comfort. The goal is to give them the opportunity to fall back asleep in a low-stimulation environment. Over time, this can teach them to link their sleep cycles. Also, re-examine their wake window. A short nap can be a sign of both overtiredness and undertiredness. Try adjusting the wake window by 15 minutes in either direction to see if it helps.
- If baby cries hysterically immediately: Intense crying the moment they are put down often points to a negative association with the crib or separation anxiety. First, spend much more happy, awake time in the nursery and the crib itself. You want to flood the space with positive feelings. Second, make sure your nap routine is very calm and connecting. If your baby is older (around 8-10 months), they may be struggling with separation anxiety. They understand you are leaving and don't know if you are coming back. For this, a gentler, in-room method like the Chair Method is often more effective. Your constant presence provides reassurance as they learn to fall asleep independently.
- If you have one "good" nap and the rest are "bad": This is not failure; this is progress! Celebrate that one good nap. It shows that your baby is capable of napping in the crib and your method is working. Do not feel pressured to fix every single nap at the same time. It is perfectly fine to have one successful crib nap and then use contact naps, a stroller, or a carrier for the other naps. The most important thing is to ensure your baby gets enough total daytime sleep. A well-rested baby is much more receptive to learning new skills. Trying to force every nap can lead to a cycle of overtiredness that makes everything harder. Stick with one crib nap a day until it is consistent, then add the next one.
Your Next Steps to Peaceful Naps
Helping your baby learn to nap in their crib is a journey. It takes time and dedication, but the reward is a well-rested baby and a more balanced day for you. Remember the core principles we have covered. A dark, cool, quiet environment sets the stage. A consistent, simple nap routine signals that it is time for sleep. And a gentle, responsive approach teaches your baby that their crib is a safe and comfortable place to be.

Consistency is the single most important factor. Choose a method that feels right for you and stick with it. Your baby will learn from the predictable repetition. There will be setbacks. Teething, illness, and developmental leaps can all throw a wrench in your progress. This is normal. When these happen, offer extra comfort but try to get back to your routine as soon as possible. Do not let a few bad days undo all your hard work.
You are giving your baby the gift of independent sleep, a skill that will benefit them for years to come. Be patient with your baby, and be patient with yourself. You are doing a great job. By taking these steps, you are moving toward a future with more predictable, peaceful naps for everyone.