
It is 2 AM. You just settled back into bed when you hear it again: a cry from the nursery. The exhaustion feels physical. The confusion is overwhelming. You are not alone in this cycle of sleep deprivation. Millions of parents face the challenge of a child who wakes up repeatedly through the night. The good news is that this is a solvable problem.
Frequent, disruptive night wakings are not just a phase you must endure. They are often the result of specific, identifiable issues. Solving them is not about finding a single magic trick. It is about following a clear, systematic process. This process involves understanding why your child is waking before you decide how to respond.
This guide will walk you through a proven 4-step framework. First, you will diagnose the root cause. Second, you will prepare your plan and environment. Third, you will execute that plan with consistency. Finally, you will learn how to troubleshoot common setbacks. This is your path to a well-rested child and a well-rested family.
Is This Normal? Understanding the Science of Baby Sleep & Waking
To solve frequent night wakings, you first need to understand how sleep works. Many parents believe the goal is to stop their baby from waking up at all. This is a common misconception. Everyone, including babies and adults, wakes up briefly multiple times each night. We typically stir between 4 to 6 times as we transition from one sleep cycle to the next. The key difference is that adults usually fall right back to sleep. We often do not even remember these brief arousals in the morning.

The problem is not that your baby is waking. The problem is their inability to get back to sleep independently. For infants, sleep cycles are much shorter than for adults. A baby’s sleep cycle lasts about 45 to 60 minutes. This is why a baby might seem to wake up every hour. They are simply coming to the end of a cycle. If they do not know how to start the next cycle on their own, they will cry out for your help. Think of sleep as a series of short train rides, not one long journey. At the end of each ride, the baby arrives at a 'station,' which is a brief wake-up. The goal is to teach them how to stay on the train for the next ride without needing you, the conductor, to get them back on board each time.
This skill of self-settling is developmental. Newborns need significant help, but things change quickly. According to the American Academy of Pediatrics, most babies are physiologically capable of sleeping for 6 to 8-hour stretches without a feed by the age of six months. This does not mean it happens automatically. It means their bodies no longer require calories every few hours at night. Persistent wakings after this age are often due to habit, not hunger. Addressing these habits is not just about your own well-being. Research highlights the importance of consolidated sleep for a child’s development. Recent 2024 findings from UNC showed that sleep disruption in early life can negatively affect brain development and the formation of synapses. Helping your child learn to sleep well is one of the most important skills you can teach them.
Step 1: Become a Detective — Diagnose Your Baby's 'Why'
Before you can fix the problem, you must identify its source. Trying sleep training without knowing the root cause is like trying to fix a car without looking under the hood. You might get lucky, but you will likely waste time and energy. This diagnostic step is the most critical part of the entire process. Go through the following audits to pinpoint the likely reason for your child's frequent wakings. You may find one clear culprit or a combination of factors.

The Schedule Audit: Overtired or Undertired?
A baby's sleep schedule is the foundation for a good night's rest. If the schedule is wrong, nothing else will work effectively. The two biggest schedule-related problems are overtiredness and undertiredness. Overtiredness is a more common cause of night wakings than most parents realize. When a baby is awake for too long, their body produces stress hormones like cortisol. This makes it harder for them to fall asleep and stay asleep. An overtired baby is like an engine that is too revved up to shift gears smoothly. They are so exhausted that their brain keeps stalling and restarting, leading to more wake-ups.
Undertiredness can also be an issue. If a baby has not had enough awake time during the day, they will not have enough 'sleep pressure' to stay asleep all night. They might fall asleep easily at bedtime but then wake up frequently, ready to play. The key is to find the right balance using age-appropriate wake windows. A wake window is the period of time a baby can comfortably stay awake between sleeps. Check your child’s schedule against these general guidelines:
- 4-6 Months: 1.5 – 2.5 hour wake windows
- 7-9 Months: 2.5 – 3.5 hour wake windows
- 10-12 Months: 3 – 4 hour wake windows
- 13-18 Months: 4 – 6 hour wake windows
- 18+ Months: 5 – 6 hour wake windows
The Sleep Association Audit: How Do They Fall Asleep?
This is the most common cause of frequent night wakings in babies over four months old. A sleep association is anything your baby needs to fall asleep. Some associations are positive, like a dark room or a sleep sack. Negative associations are things they cannot recreate on their own. These include being rocked, fed, held, or having a pacifier replaced by you. Imagine you always fall asleep with a pillow. If you woke up in the middle of the night and your pillow was gone, you would be wide awake looking for it. For a baby, if that 'pillow' is being rocked to sleep, they need you to come 'replace the pillow' every time they stir between sleep cycles.
If your baby falls asleep in your arms at bedtime and is then transferred to their crib, they will be confused when they wake up alone. They will cry because the conditions have changed. The solution is to teach them to fall asleep in the same place they will wake up: their crib. The process of breaking sleep associations involves gradually removing these props. This allows your child to discover their own ability to self-soothe.
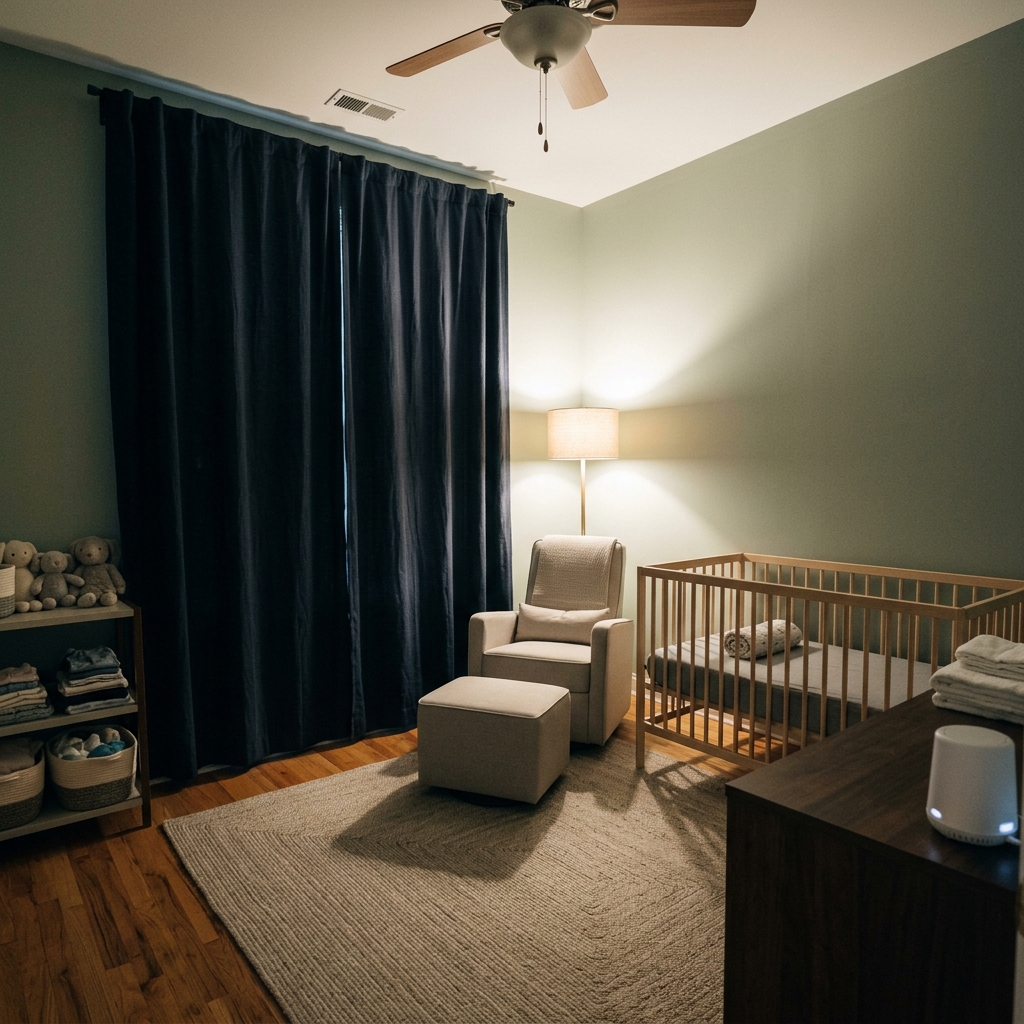
The Environment Audit: Is the Room Sabotaging Sleep?
A baby's sleep environment can either support or sabotage their sleep. Even small inconsistencies can trigger a full waking. Your goal is to create a space that is optimized for sleep and remains consistent all night long. The room should be pitch black. Use blackout curtains to block all outside light. Even a small amount of light from a streetlamp or a nightlight can interfere with melatonin production, the hormone that regulates sleep. The room should also be cool. The ideal temperature for sleep is between 68-72°F (20-22°C). A room that is too warm can lead to restless sleep and more wakings.
Finally, consider sound. A continuous white noise machine can be very effective. It mimics the sounds of the womb and helps to block out sudden household noises that might startle your baby awake. Make sure the white noise runs all night without a timer. If it shuts off after an hour, the sudden silence can be just as jarring as a loud noise and can cause a waking.
The Hunger Audit: Genuine Need or Comfort Snack?
Many parents assume that every night waking is a sign of hunger. For newborns, this is often true. However, as babies get older, this changes. As mentioned, most babies over six months who are growing well do not need calories at night. If your older baby is still waking to feed multiple times, it is more likely a habit than genuine hunger. This is often called comfort nursing or comfort feeding. The feed has become a sleep association.
Another issue to consider is 'reverse cycling.' This happens when a baby takes in a large portion of their daily calories at night. They snack all day because they are not very hungry, then wake up frequently at night to make up for it. To break this cycle, you need to focus on offering full, complete feeds during the daytime. Make sure your baby is eating without distractions. If your baby is not sleeping through the night and you suspect it is habit, consult your pediatrician. They can confirm if your child is ready to be night weaned based on their age and weight gain.
Step 2: Prepare Your Plan & Your Environment
Once you have diagnosed the likely cause of the wakings, it is time to prepare for change. Do not jump into a new strategy tonight. Taking a few days to prepare will dramatically increase your chances of success. This phase is about setting the stage, aligning with your partner, and getting all your tools in place. Follow these steps sequentially to build a solid foundation.
- Optimize the Schedule First
- Solidify the Bedtime Routine
- Choose Your Response Method
- Prepare the Sleep Space
Optimize the Schedule First
Before you change how you respond at night, you must fix the daytime schedule. An overtired or undertired baby will struggle with any sleep training method. Spend three to five days focused solely on the schedule. Use the wake window chart from Step 1 as your guide. Track your baby's naps and bedtime to ensure they are not awake for too long. Pay close attention to the last wake window of the day. If it is too long, your baby will be overtired at bedtime. If it is too short, they will not be ready for a long night of sleep. A consistent schedule helps regulate your baby's internal clock, making sleep more predictable.
Solidify the Bedtime Routine
A bedtime routine is a powerful signal to your baby's brain that sleep is coming. It is a non-negotiable part of the process. The routine should be calm, consistent, and last about 20-30 minutes. It should happen in the same order every single night. A good routine might include a bath, putting on pajamas and a sleep sack, reading a book, and a final feed. The final feed should happen at the beginning of the routine, not the end. This helps to break the association between feeding and sleeping. The routine ends when you place your baby in their crib.
Choose Your Response Method
This is where you decide how you will respond to crying, both at bedtime and during the night. Many people think sleep training means letting a baby cry it out alone for hours. This is a myth. There is a wide spectrum of methods available. Gentle methods include the Chair Method, where you sit in a chair next to the crib and gradually move it out of the room. The Pick Up/Put Down method involves comforting your baby but putting them back in the crib as soon as they are calm. More structured methods include the Ferber method, which uses timed checks that get progressively longer.
There is no single 'best' method. The best method is the one you and your partner can execute with 100% consistency. Consistency is more important than the method itself. Discuss the options and choose one that feels right for your family. Once you choose, commit to it. Switching between methods will only confuse your child and prolong the process. The goal is to teach your baby to self-soothe in a way that you can maintain.
Prepare the Sleep Space
Do a final check of the sleep environment. Make sure you have everything you need before you start. Install the blackout curtains and test them during the day. Set up the white noise machine and find a volume that is effective but not too loud. Ensure the crib is safe and clear of all loose items, including blankets, pillows, and bumpers, to follow safe sleep guidelines. The environment at 2 AM must be identical to the environment at 10 PM. This consistency removes variables and helps your baby understand that night is for sleeping.
Step 3: Execute With Confidence & Consistency
With your diagnosis complete and your plan prepared, it is time for action. The key to this step is absolute consistency. Your baby is learning a new skill, and mixed signals will hinder their progress. The process for handling bedtime is the foundation. Your response to night wakings must mirror your response at bedtime. This reinforces the lesson that they are capable of falling asleep on their own, no matter the time of night.
| Situation | Action | Rationale |
|---|---|---|
| Bedtime | 1. Follow calming routine. 2. Place baby in crib drowsy but awake. 3. Say your goodnight phrase and leave. 4. If crying, begin your chosen response method (e.g., timed checks). | Teaches the skill of falling asleep independently from a calm state. This is the core of the entire process. |
| Night Waking | 1. Pause for a few minutes to see if they resettle. 2. If crying persists, do a quick check (diaper, fever). 3. If it's a scheduled feed time, feed calmly in the dark and put back down awake. 4. If not a feed, use the exact same response method you used at bedtime. | Reinforces the skill of self-settling. Inconsistency (e.g., doing checks at bedtime but feeding at 2 AM) will undermine all progress. |

What 'Drowsy But Awake' Actually Looks Like
This is the most misunderstood step in sleep training, but it is the most important. 'Drowsy but awake' does not mean half-asleep. It means your baby is calm, relaxed, and ready for sleep, but their eyes are still open. They should be aware that they are being placed into their crib. If you put them down already asleep, they miss the crucial lesson of how to get from awake to asleep on their own. When they wake up later, they will be unable to replicate that process. It may take some practice to find the sweet spot between drowsy and asleep, but this is the moment where the learning happens.
Handling a Toddler vs. a Baby
The core principles of this process apply to toddlers as well, but the execution requires some adjustments. Toddlers have more cognitive abilities and a greater capacity for separation anxiety and boundary testing. With a toddler, verbal communication is key. Explain the new plan in simple terms. You can use an 'okay to wake' clock, which uses a light to signal when it is okay to get out of bed. Your response must be firm and consistent. If they get out of bed, calmly and silently return them each time. Avoid lengthy discussions or negotiations in the middle of the night. Your role is to be a calm, confident leader who consistently upholds the new sleep rules.
Step 4: Troubleshooting — What to Do When It Gets Tough
Changing sleep habits can be challenging. You will likely face setbacks. Knowing what to expect can help you stay the course and not give up just before a breakthrough. This section addresses the most common hurdles parents face during the sleep training process.

One common phenomenon is the 'extinction burst.' This is when your child's sleep gets worse for a night or two before it gets dramatically better. This often happens around night three or four. The increased crying is a sign that your child realizes the old way of getting your attention no longer works. It is a sign that the process is working, so do not give up. Illness and travel will also disrupt your routine. It is okay to pause the plan and offer extra comfort when your child is sick. However, try to get back to your consistent routine as soon as they feel better. The longer you wait, the harder it will be to get back on track.
Developmental leaps, nap transitions, and sleep regressions will also temporarily affect sleep. A baby learning to crawl or a toddler learning to talk may have trouble settling their minds at night. The key is to stick to your consistent response. Acknowledge the new skill during the day, but do not change the sleep rules at night. Your consistent response is the anchor that will guide them back to good sleep once the leap has passed. Finally, many parents worry about hunger. The question, 'But what if they are really hungry?' can undermine your confidence. The solution is to make a clear plan beforehand. For example, you might decide that for your 7-month-old, you will offer one feed if they wake after 2 AM, but you will use your non-feeding response for all other wakes. Write down your plan and stick to it. This removes the guesswork and emotion from your middle-of-the-night decisions.
Your Next Steps to Peaceful Nights
Stopping frequent night wakings is a process of teaching your child a valuable life skill. It is not about enduring a problem until it magically disappears. By following a structured approach, you can empower your child to become an independent sleeper. The journey requires patience and commitment, but the results are transformative for the entire family.

Remember the keys to success: a consistent, age-appropriate schedule; a bedtime where your child learns to fall asleep on their own; and a predictable, unwavering response to night wakings. It may feel challenging for a few nights, but the outcome is a child who gets the restorative sleep they need for healthy development and a family that is no longer defined by exhaustion.
Feeling overwhelmed? Start with our free Night Waking Diagnostic Checklist. In just 5 minutes, you can pinpoint your primary sleep challenge and get a personalized starting point for this 4-step process.